How are you doing? It’s been a very inspirational weekend for me and I am now busy with deadlines and yoga, as usual!
#THFChallenge16 ended just a couple of days ago and I’m already missing all the daily chats and pics.
No yummy, no fancy, no magic. Just you and your mat. Determination and courage.
I have seen beautiful people believing in themselves and yoga newbies falling in love with their new practice. Loved it.
We need more yoga. We need a healthy lifestyle.
I’m feeling inspired!🐬💟
And the winner is…
As I have said my #THFChallenge16was created to connect, share and bring the yoga vibes. It was open to all levels and possibilities, but as any other challenge it had to end and I had to pick a winner…
A growing yoga community. Love it! #THFChallenge16
…so, the yoga winner is Kendra Larson, aka @kendracarlee on IG. 🎉 🎉 🎉
She has been posting almost every single day and I loved her enthusiasm. Have a look at her IG profile! 🙂
What’s next?
My yoga practice is growing strong and although I haven’t had a lot of time to exercise, I can see the progress.
I am not a big fan of magical unicorns and dreams, I’m more on the planning-and-getting-stuff-done side of life. Maybe it is not that glamorous, but it works for me, my students and the people I work with.
So, I am thinking of making things more interesting with vids, fitness & healthy practical tips for beginners and freelancers alike willing to get on the mat.
I think we all need that bit of confidence and sweet motivation.
Check the blog, my IG and Twitter (@THealthyF) profiles to get all the updates!
As usual, thank you for reading & sharing the healthy vibes,
Welcome to #THFChallenge16– Day 9. It’s our last day.
A bit sad, I know. It’s been such a fun challenge! 🙂
But as all good things come to an end…it’s the case of our yoga challenge, too. I’ll keep on sharing and writing here and on IG (@yogafitsara), FB (The Healthy Freelancer) and Twitter (@THealthyF).
So, maybe you are a busy freelancer looking for some healthy inspiration, a fellow mancunian into yoga and fitness, a distant follower enjoying the blog, a translator like me into all things health and fitness or a random reader. But we’ll keep in touch, friend. Yes.
It was such a nice experience and lovely journey to see your progress, comments and pictures that I am thinking about new contests, ideas and prizes. So, stay tuned!
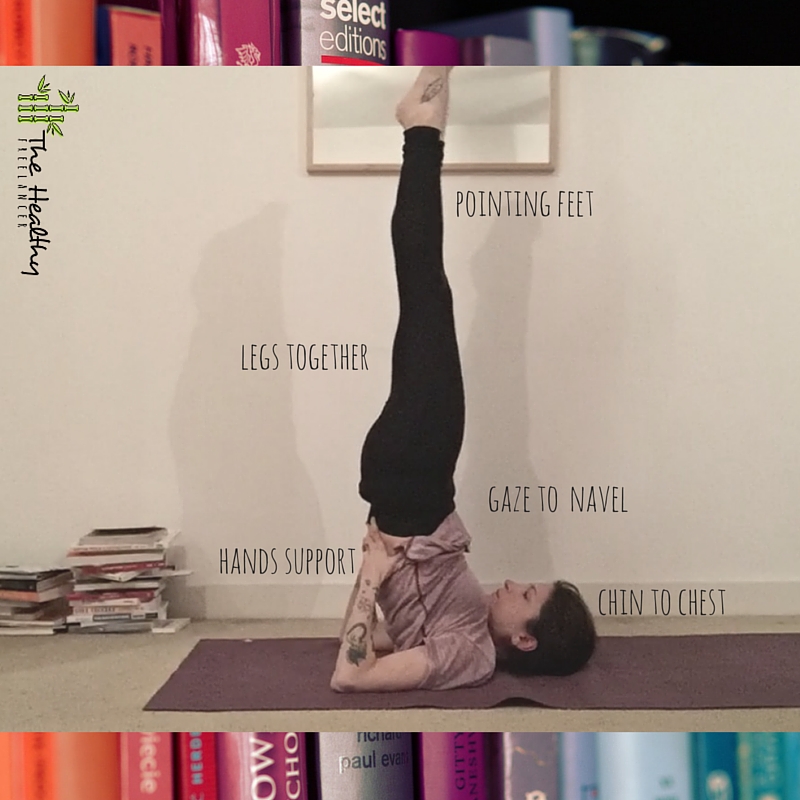
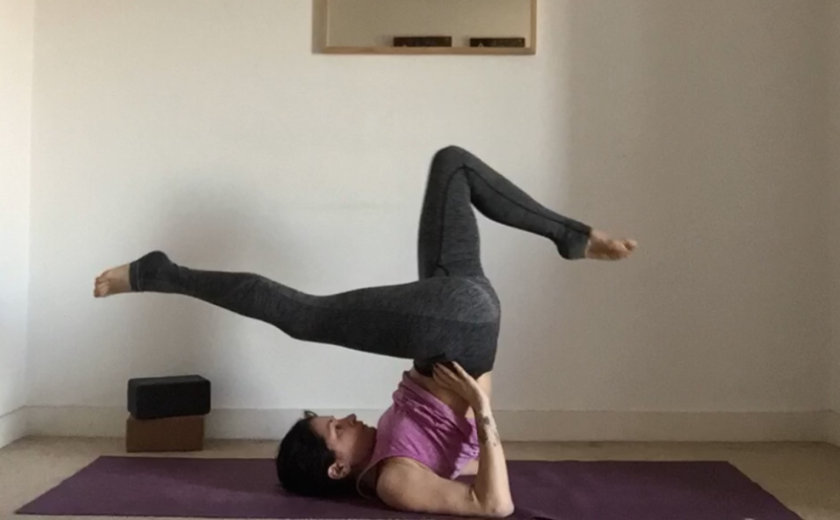
But for now, we have to check on the last, 9th, pose of #THFChallenge16: modified shoulder stand!
Let’s first have a look at how to get into a shoulder stand:
Shoulder Stand || (c) The Healthy Freelancer 2016
You can use a blanket or two for extra cushioning and support you neck, so get on the mat, find what’s the most comfortable option and let’s start!
Lie supine, keep the blankets and extra layers under your head
Bend you knees and place your feet on the mat
Inhale, lengthen the arms to the side, exhale push your feet and legs away from the mat towards your head, bend your legs and bring them to the chest
From here, keep on pushing your legs and thighs up, bend your elbows, draw them closer and place the arms on your lower back to support the weight of the lifted legs.
Raise your pelvis over the chest/torso, so that the legs will form a perpendicular line going from the mat to your feet.
Straighten your legs up, keep the thighs and the inner legs closed together. Keep the legs engaged and help yourself engaging your abs and pushing the inner thighs together.
Keep your shoulder blades strong against your back, move the chest toward the chin.
Point your feet and spread your fingers wide open.
Keep on pushing and engage your elbows to allow a full spinal extension.
Gaze toward the chest or the navel.
Stay here for 5/8 breaths.
Now let’s try a modified variation, as shown in the contest:
Modified supported shoulder stand || (c) The Healthy Freelancer, 2016
From your supported shoulder stand, bend your knees while keeping the legs straight and vertical
Keep your elbows engaged and your chin to your chest
Stretch out the right leg toward the back of the mat and keep it parallel to the mat and your head
Balance the pose helping yourself with the other leg.
You can create more support by sliding the elbows and the hands on the side, so you will also releases the pressure on the neck. However, I’d suggest you to first try by keeping elbows and hands places as initially (on your lower back).
Keep the abs engaged
Stay here for 5/8 breaths
To get out of the pose: bend the knees to the torso, slowly roll your back on the floor/mat, keep your head on the mat, keep your legs on the chest and hug them, gently come back in sage position. To know more about this pose and its benefits, read this article.
As I have said before, this is a very challenging pose, so I’d suggest you to avoid it if you have had neck injuries, have blood pressure problems or are pregnant.
Having a bad headache can also be an issue and will make the pose way less comfortable, so avoid it.
If you are familiar with this shoulder stand, instead, I’d suggest you to progress into a full or half head stand and have fun with inversions at the end of the practice! 🙂
How to progress in your yoga practice
If you liked the challenge and would like to find more yoga inspiration, I’d suggest you to follow
Kino and Adreiene are very active also on YouTube and IG, so have a look and follow them.
In my personal experience, there is nothing like practice in yoga.
Reading is fine and it’s important to understand the anatomy of each pose, its benefits and how to modify it or improve it.
But practice is everything. Linking theory to practice is the only way to understand how these crazy magic words such as “meditation”, “karma”, “pranayama”, “chakra”, “self-love” really work. Yes, self-love it’s a very tricky word.
Start with 2/3 times a week. 30-45 minutes, alternate self-practice and led classes to have the support of a teacher and understand what you have to improve.
Then move the practice into your daily life: eat well, avoid overeating, live well.
Take 5 minutes a day for your meditation. Check this quick and clear guide on meditation written by the amazing Zen Habits blog (my favourite!).
Meditation is an activity that trains the brain, and as such, it requires practice and time.
You can’t stop thinking, but you can train the mind to think the right way. To be less stressed and de-clutter the space to create more space for clean and positive energy.
If you are already playing sports or training at the gym, don’t stop. It’s important to mix and alternate activities – unless you are a specialised athlete! – to live a healthy lifestyle.
But, always, practice.
10 minutes to one full hour or more. It’s up to your time and experience.
Changes will happen after the first attempt. You’ll feel better, stretched, healthier.
Thank you guys for joining my #THFChallenge16 – I’ll announce the winner the next week. The winner will receive a notification and then will be featured on the blog and on social media.
In he meantime, keep practicing and sharing the vibes!
What are you doing to celebrate the weekend? I’m getting ready to speak at a workshop so it looks like another working weekend, but that’s ok. Freelancers gotta freelance! 🙂
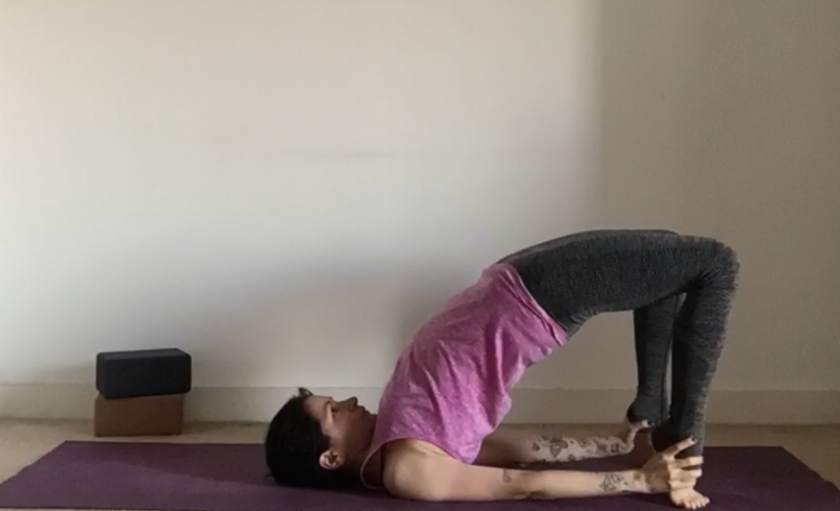
Bend your knees, feet on the mat, hips width apart.
Press the feet on the mat, push your hips and back up. Keep your thighs and inner part of the feet parallels.
Walk your shoulders under the back, as if you had to fold them back. Clasp your hands.
Press your shoulders and arms and bring your chest up. Open your chest, lift your chin and push a but more until your chin touches the chest again.
Keep the legs engaged and keep on pushing your hips up, stay here for 5 breaths.
Try my variation of this pose by releasing and lengthening your arms. Push your heels up away from the mat and grab or touch your ankles with your hands. Keep on pushing hips, chest and back up and breathe naturally. Stay here for 5.
To get out of the pose, unfold the shoulders, bring them back on the mat, release the arms on the sides, drop your heels, gently bring your hips, core and thighs back on the mat. Stay here for 3 breaths.
Yoga at your desk
Yoga is a very comprehensive discipline, it fits beginners and advanced students, fitness freaks, pros and athletes, meditation junkies, dancers and busy freelancers.
It can be done at your desk. Yes, yes! We love to take frequent breaks, don’t we? So why overeating when you can take a mindful step toward a healthier life with some yoga at your desk?
Here it is a nice video by Adriene (oh yes, I love her! <3)
It’s all for now, guys!
I’ll be back tomorrow with our #THFChallenge16 day 8: upward plank pose!
Keep on sharing your progress and tag me (@yogafitsara) in your IG pic, the winner will be featured on the blog!
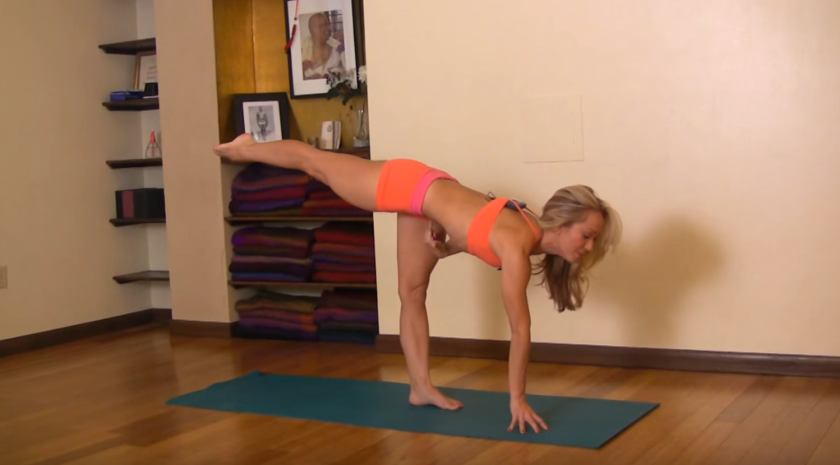
Friends, it’s the 6th day of our #THFChallenge16and today’s pose is a favourite!
It’s the Mermaid variation of the Lord of the Dance: strong, good, sexy, challenging. A great pose.
This pose is a bit more challenging the the other 8 asana of #THFChallenge16, but it works wonders for strength, stability, back stretch, hip and legs flexibility.
Your becomes strong and rooted, while your upper body stretches deeply as you extend your spine and enjoy the freedom of this asana. Magic. Love it.
So, let’s have a closer look! 🙂
Start by warming up your legs and chest with 5 sun salutations A+B. If your are already practicing and want to include this Mermaid variation in your yoga sequence, exercise your chest and legs with camel pose, upward facing dog and then when you are ready come into Tadasana (mountain pose) – just stand on your feet with touching toes, look forward, engage your core, open the chest nicely and breathe deeply.
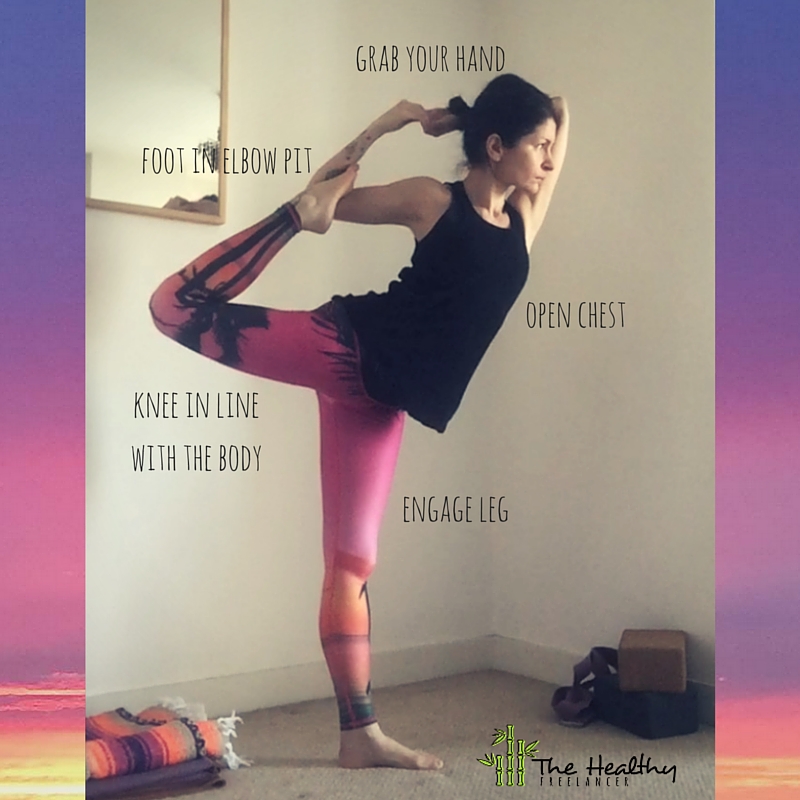
Engage the legs, stretch your right leg back as in a thigh stretch.
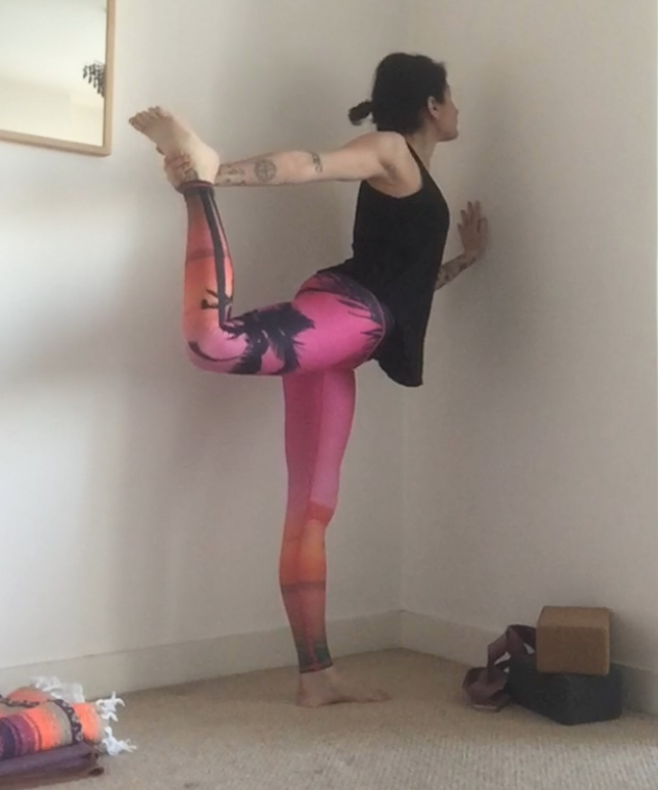
Bring your right leg up: keep your arm extended and engaged, hold the knee, pulling it up, keep the standing leg straight and strong. If necessary, help yourself with a wall:
Both legs are aligned and you can feel the stretch in your torso, hip and lower back.
Tuck the foot into the elbow pit. Let it slide down the right arm and when it reached the elbow pit close bend and close the elbow to help you lock the toes and keep them stable. This will require a bit of extra balance and knee flexibility. Help yourself with the opposite arm, keep your spine arched and the standing leg strong.
Straighten the left arm and rotate the elbow outwardly, bend it back and grab your right hand.
Look forward toward a fixed spot and keep your gaze for 5/8 breaths, depending on your experience.
To get out of the pose, release the leg and drop the right knee. Come back into tadasana or counterbalance Mermaid with a nice standing forward bend.
This asana is usually practiced at the end of the yoga class, as it is challenging and requires a good amount of warming up. If you are a complete beginner and are unfamiliar with other standing backbends such as the Lord of the Dancer, you can try an easier variation of the Mermaid. Take a look at the following video for more details about how to perform it:
It’s all for now!
Keep on sharing your pics on IG to win a chance to be featured on the blog! Simply tag me (@yogafitsara) and use #THFChallenge16hashtag.
Welcome to day 5 of #THFChallenge16 – Child’s Pose!
Easy, relaxing pose great for your legs and back. Grab a mat and start practicing, you’ll find more details in the following video by the lovely Adriene.
Balasana (Child’s Pose) is a restorative pose often used as an alternative to down dog in your vinyasa or whenever you need to relax for a moment during an active yoga class/sequence.
It carries some old good child’s memories, it gets you back to you childhood and for this reason can be a loved or hated pose. Although most poses carry deep meanings, this one (maybe because it’s so linked to our childhood) can challenge your mind and spirit.
Personally, I like it but I don’t find it very comfortable as I have a broken knee that cannot always be completely bent, so, sitting on my heels can be painful. But since I started my yoga practice, I went from not being able to bend the knee to Balasana, Lotus, etc.
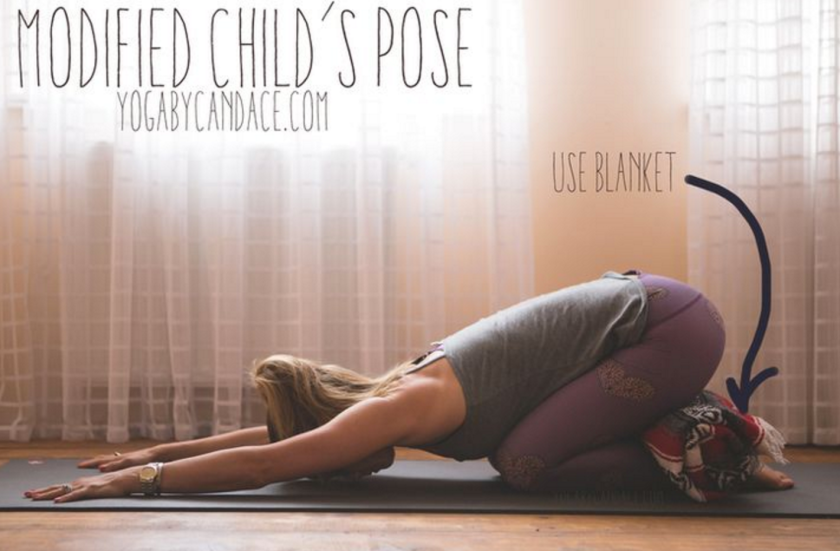
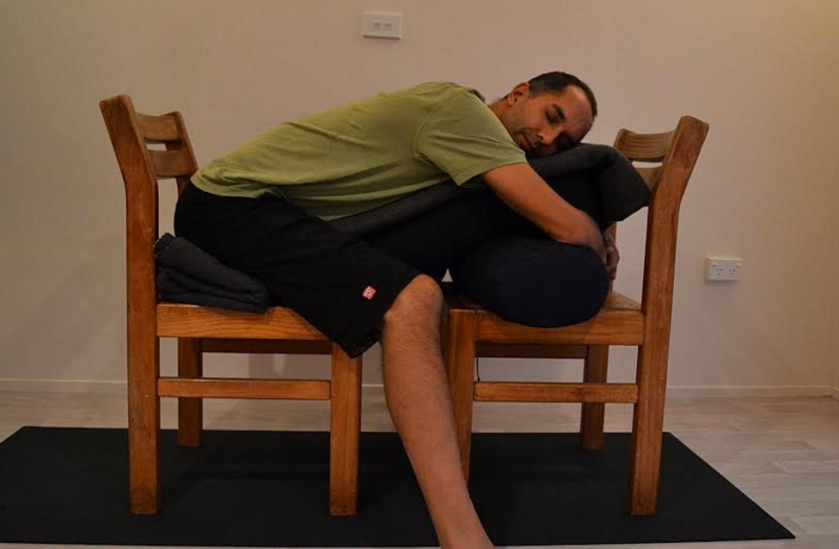
If you suffer from old knee injuries or have back problems, I would suggest you to try the following variations:
• use a bolster to support your chest & lower back
Credits (c) Fitness Magazine
• sit on a block or blanket
• use 2 chairs to avoid sitting on your knees:
Credits (c) Sacred Moves – Picture from theyogalunchbox.co.nz
I like this last variation and I think that although it is a “variation” it could be practiced together with full Balasana. Alternating the two will work on different areas of the body and also help you to release your shoulder tension.
To know more about how to use props in Balasana, have a look at the original article.
It’s all for now!
I’ll be back tomorrow with #THFChallenge16– day 6: Lord of the Dance (Mermaid variation)!
I love this asana, it’s beautiful, elegant and so so good! 🙂
Have a lovely day people! Keep on sharing your progress on IG, the winner will be featured on the blog!
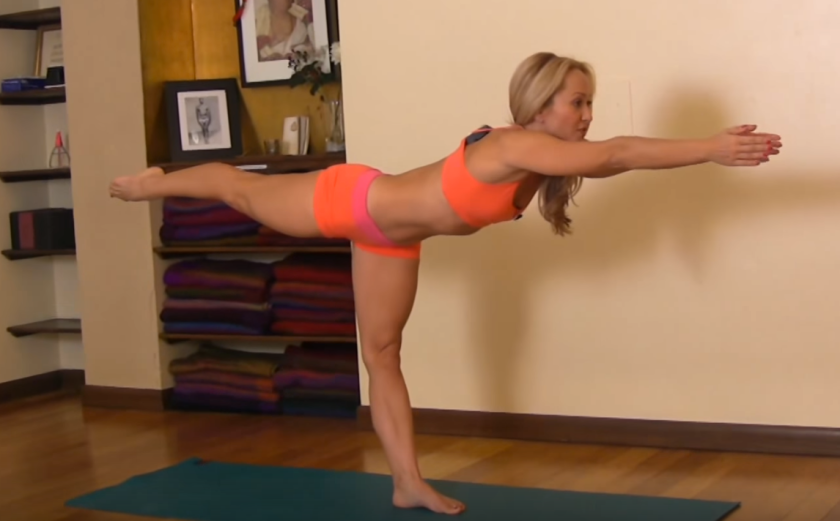
Let’s make it work with some yoga: #THFChallenge16, day 4…Warrior III!
WARRIOR 3
This is a very good and balancing pose. You will work your legs, abs and back while will learn to improve your balance and drishti (focused gaze).
Warrior III is referred to as Virabhadrasana or Digasana, in traditional Ashtanga.
I have heard it named in all three ways, Kino calls it Digasana, as that’s how traditional Ashtanga defines it.
What’s important is to avoid getting lost during our class, so just remember it has 2 different names, but the asana is the same. 🙂
It can be said that this pose is one of the most challenging poses from our beginners’ yoga challenge. But, once you master it, you’ll realise it is also very good and can boost your mood.
Start in standing position and get into a forward bend to stretch your back and legs:
Photo Credits Kino Yoga
As you inhale, come forward and bring your arms in front of you. Legs and arms are engaged and strong. Neck and face are relaxed but in line with the spine. You should feel a gentle stretch in your hamstrings and legs.
Photo Credits Kino Yoga
Now, engage the core and lower back because they will support your balance through the pose. Lift your right leg back. Gently but steadily. Don’t rush the movement, finding the balance requires adjustment and you have to “listen to your body” to avoid overdoing.
The right hip has to be parallel to the floor and in line with the spine, don’t push it too much, don’t curve the spine. It’s engaged and steady. Let the abs counterbalance the pull and help you out.
Photo Credits Kino Yoga
Lift your arms.
You can try and help yourself balancing the pose, but to get into full position you’ll have to straighten the arms in front of you, eventually.
At this point your legs are both engaged: the left leg is locked and sustaining most of the weight, so stability is important, while the right leg has to be parallel to the floor, stretched and nicely aligned to your back, hips and spine.
You should form a line going from your heels down your leg, hip, side, torso, neck, head, arms and hand.
Your head is now up and looking towards your fingers. Look forward, feel the energy.
Photo Credits Kino Yoga
Watch Kino’s full description of the pose here:
For those of you who don’t know Kino, I’d suggest to check her IG (@KinoYoga) and watch her YouTube videos as she is always showing new techniques and tips to improve your Ashtanga style.
I’m an “ashtangi” and it is no secret that I adore her.
I’d love to do yoga with her one day, let alone meet her and have a chance to talk more about all things yoga! 🙂 She’s experienced, energetic and inspiring. Amazing. Ok…I think I made myself clear!
Meditation
As part of a regular yoga lifestyle it is important to practice meditation, too.
If you are new and don’t know where to start from, my suggestion is to read the following books:
You can surely find more books online and at your local studio, but these 3 are all very good and practical guides. If you read them all, you’ll have a chance to explore meditation from different angles and learn more about tips, techniques, reasons to meditate and how can a more mindful lifestyle help you to live better.
The core of meditation is understanding that it is a lifestyle, rather than a scheduled activity. Meditation itself requires exercise and practice, but then, applying a mindful approach to your daily life is what makes things work in a different way. What makes you feel better.
Talking about practicing, I’d also suggest you to download two awesome meditation apps: Calm and Headspace.
This website has developed its own app and book and can help you with relaxing atmospheres, background noise and music, inspirational stories and meditation breaks.
The 2 features I like most are the website relaxing sceneries (each comes with its own natural sounds and moving scenery) and the different meditation exercises on the app. I like to choose between 2 and 20 minutes and I usually go for the 10-minute exercise.
Headspace is a meditation tool that comes in two free and membership-only options. The creators call it a “mind gym”, which is quite true because it really has many different types of meditation exercises, developed in a Headspace Journey. These exercises help you to progressively learn and improve your meditation techniques, while you can track the exercises and are encouraged to keep a meditation diary , as well.
Ok guys, it looks like it is time to grab your mat and try today’s #THFChallenge16 pose: warrior 3! Remember to share your pics and tag me on IG (@yogafitsara) for a chance to be featured on IG, social media and HERE! Yes, yes!
The winner will be featured on the blog: interview, review, your own article…up to you! 😀
It’s all for now, see ya tomorrow with day 5: child’s pose!
I’m quite excited as I’ll be running a workshop on desk yoga tomorrow and then I’ll lead another workshop – but this time is on marketing – on Saturday. Plus yoga. So much yoga!🌟
But first, coffee. ☕️
And a bit of our #THFChallenge16, featuring Downward Facing Dog!
I’ll pick a daily IG photo to be featured on my social media and then at the end of the challenge (January 24th) a FINAL winner who’ll be featured here on the blog, too!
So grab your mat and join us, you could end up being interviewed or connecting with more new people!
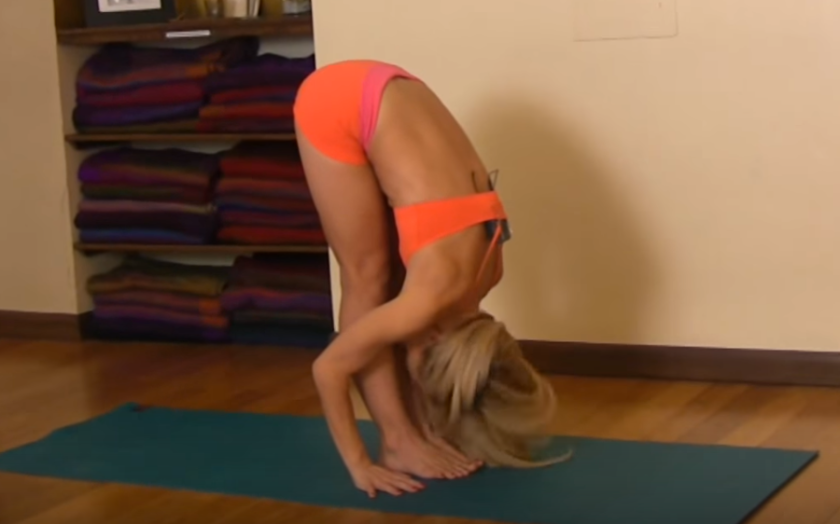
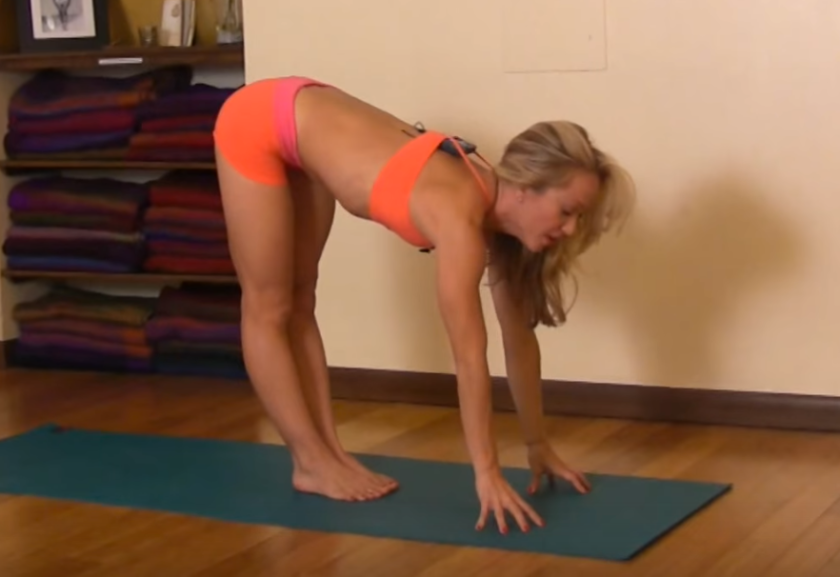
Downward Facing Dog
#downwardfacingdog – The Healthy Freelancer (c) 2016
This is a very good asana, one of those poses you will surely find quite often in your yoga class. From Sun Salutation A and B, to your vinyasa, hatha classes, single self-practices, home videos.
Downward Facing Dog is a must, like a pair of Asics shoes. 😀
So let’s see how it works.
From Balasana – child’s pose – come into Table position. Bring the knees hip width apart, your arms parallels and your hands a bit forward of the shoulders. Hands are wide open and engaged.
Exhale and push your knees away from the mat. Lengthen your spine, keep the arms engaged, look down to the mat, push your tailbone away from the pelvis and keep your abs engaged. Keep your arms steady and strong, hands are open and strong.
If your hamstrings are too tight you’ll find yourself rounding the spine to compensate. Try to bend the knees, instead. This will help you to focus more on your spine and pushing/lengthening your pelvis away from the shoulders.
If your legs are bent stay here for 5 seconds and keep on breathing naturally and deeply. Keep your faced relaxed between your arms.
If your legs are straight and your feet open and nicely engaged, then drop them down and try to reach the mat. It might take a few attempts, it might no happen today, but instead of frustrating yourself over your lack of flexibility, check your alignment: is your pelvis away from the shoulders? You should draw an imaginary perpendicular line going from your pelvis to the mat that should divide your body in the upper and lower half quite nicely and in two equal parts. If you are bearing all the weight on your shoulders and arms then dropping the heels will be more difficult. On the contrary, if you are pushing shoulders and lifting your tailbone too much, it might hard for you spine to flex.
You can try and open your heels a bit, so that the outer edges of your feet will be parallels to the edges of the mat and this will help you to drop your heels and stretch your legs and hamstrings.
Arms and hands are engaged and strong.
You should feel the stretch through all your spine, lower back and legs/hamstrings.
Downward dog brings back the lost energy, boosts your morale and activates your mind. Try and keep this pose for 1 minute to feel all its benefits.
To get out of the pose, I’d suggest to either slowly walk toward the front of your mat and then get back into mountain pose for another 3/5 calming breaths or:
If your heels are on the mat, push them away and bend your knees slowly and gently.
Come back into table pose: legs are parallels and right below your tights, arms are straight and hands wide open. Your neck is relaxed and there’s enough space between your shoulders and your neck, it feels natural.
Go back into Balasana – Child’s pose – by bending your knees and sitting on your heels. Lay your torso on the tights, stretch your arms in from of you.
Relax your face and close your eyes. Stay here for 5/8 breaths.
Fitness tip
This asana is very good for your stiff back, legs and, in general, to help you rebalance your energy and counterbalance a long day of sitting at your desk.
You can also modify it by lifting your legs back, step forward and get into Warrior 1 or 2…you can build an entire practice starting from Downward Facing Dog!
But if you are looking for more healthy tips on how to improve your healthy routine and lifestyle, I would suggest you to have a look at Carly Rowena’s fitness blog. It is packed with fitness tips, personal suggestions, fitness fashion reviews and recipes. Her approach is honest, so you won’t find shouting videos and gym selfies. Rather, a varied recount of her fitness experience and journey that includes also great pics and exercise examples/resources. A good starting point.
And if you are feeling a bit unsure about the qualities of yoga, come and check tomorrow’s workshop on doing yoga at your desk for busy freelancers! We’ll talk about improving our posture and more.
That’s all for now!
Remember to share you #THFChallenge16Day 3 pic with me on IG today!
I’ll be back tomorrow with a the #WarriorIII pose and more healthy tips!
I hope you are having a great weekend, it’s been a snowy night here in Manchester and today we’re enjoying the pristine view and some good, hot, coffee!
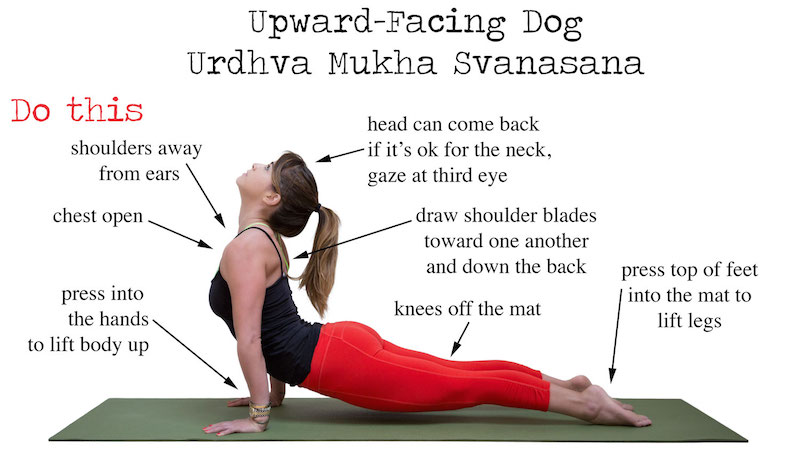
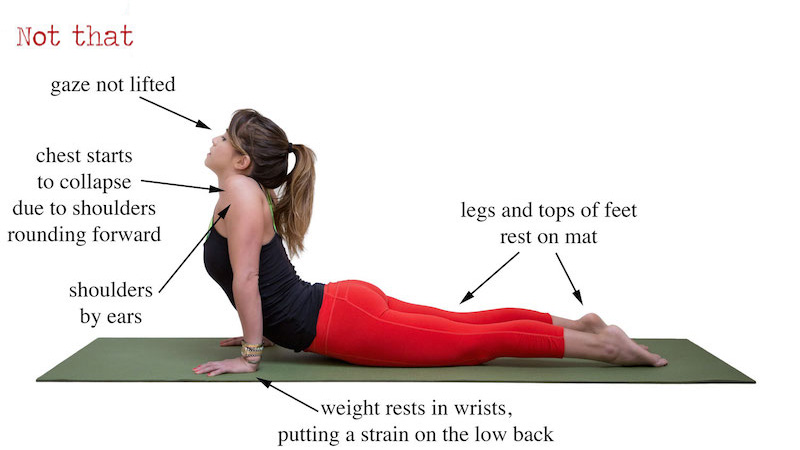
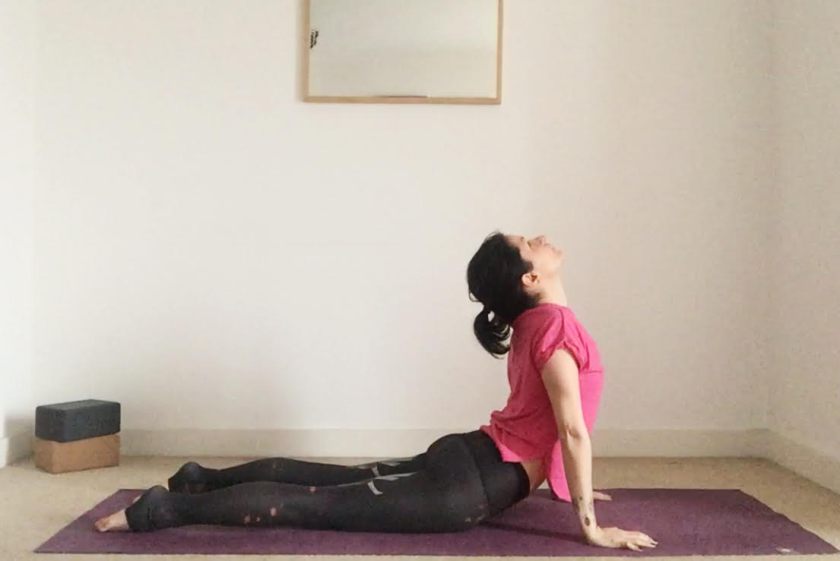
But it’s time to get back on the mat for day 2 of the #THFChallenge16: upward facing dog!
Upward facing dog is a very popular asana that you will find in most practices, starting from Sun Salutation A and Sun Salutation B.
How you set up your spine in this position will determine the success and extent of the backbend, so it will also determine how your shoulders and neck will be positioned.
To lift your spine and extend it the right way, remember to engage your core, your arms and push the pelvis forward.
Bring your shoulders blades back, lift the chin, open your chest and create space.
It is very important to maintain a relaxed face and keep on breathing rhythmically, even if you go into the full backbend and head extension.
In yesterday’s article and IG post I’ve given details about how to get into the gentle twist. Today I’ll be sharing more healthy resources and tips, starting with the Upward Facing Dog description.
To get this asana right, have a look at my instructions and the following infographic:
From plank pose: drop your hips and legs, roll forward and extend your spine. Keep arms, abs and hips engaged.
Press down, drop your shoulders, rotate your shoulder blades back, open your chest forward, look up toward the sky.
Inhale, press the top of your feet and lift your legs and tights off the mat with strength and balance.
Stay there for 3-5 breaths and keep on inhaling/exhaling rhythmically while gazing at the sky. You can get into full neck extension or simply stay where you are. It doesn’t have to be painful, so don’t rush into this full variation.
To get out of the pose: release the hips and the legs on the mat, release the neck and come to a natural forward-facing position, bend your arms gently and either:
Curl into child’s pose (Balasana) to counterbalance the spinal extension and relax your shoulders or
Tuck your toes under, press your legs back with your extended arms and come into Downward Facing Dog, then from here walk or jump to the front of the mat and slowly come up: core, chest, heart, neck and head. Get into a simple standing pose. Keep on breathing and stay here here for 3.
Here are a few tips on how to master this asana, by Candace:
I’d suggest you to also follow her IG and YouTube channel. She’s really fit and her posts are clear. Great for beginners and experienced students, too.
Benefits of this pose
Upward facing dog is a pose that will open your chest, shoulders and neck nicely and steadily. It is good also to stretch your hips and tights and help you to build strength and balance. The back and the spine are both involved and will largely benefit from this asana, too.
Upward facing dog involves a steady work on the heart chakra (t’s the chakra placed in your chest), so breathing naturally and continually is important to help the energy flow and support your determination in this pose.
The heart chakra (anahata) is the centre of your feelings and love for yourself and the world: compassion, joy, caring, connection and the ability to bond with other people and, in general, the world around you.
If you are feeling weak, having blood pressure issues, find it difficult to trust yourself or other people or are feeling a bit down and think you are not good enough or worth it, then your heart chakra might be blocked.
Camel pose, upward facing dog pose and cobra pose can all help to align and balance a stressed heart chakra (more here and here).
Let it go
Yoga can be an emotional practice. It can bring up unresolved issues, doubts but also hopes, strength and unexpected energy. Revelations, ideas, a new perspective.
It’s a transformative journey that starts from your body and digs deep into your mind and spirit, changing the way your perceive yourself and others, but also your lifestyle.
Setting a personal intention before starting your meditation or yoga practice is a good way to focus better and also get deeper into your mind and feelings. For this specific pose, and most of the poses involving your heart chakra, I use “let it go” or “I let go” to focus on releasing the energy that is blocking the chakra.
Let it go.
Let go of what no longer serves you.
Let it go.
Feel the silence of the moment and create space for your feelings and self.
Clean your mind, heart and body.
Letting go is a bit like decluttering, a bit like being on a detox.
Clean, purify, clarify.
#THFChallenge16 Day 2- Upward Facing Dog || (c) The Healthy Freelancer, 2016
That’s all for now!
Remember to share you #THFChallenge16 Day 2 pic with me on IG today!
I’ll be back tomorrow with day 3, downward facing dog and more healthy tips!
Today we begin with an easy gentle twist that suits beginners and advanced healthy people, so grab your mat and let the flow begin!
This pose helps the lower back through the upper back and you should feel a gentle twist through the spine. The internal stretch massages your digestive organs, stimulating the metabolism, your digestion and pushing away toxins from your kidneys and liver.
It will open your hips, work on your spine helping you to release the tension and it is very good for those working long hours at their desk or in front of a computer.
When approaching this pose, or any other new yoga asana, I’d suggest you to always keep in mind the following:
move slowly
breathe deeply and continually
if it is too painful then slow it down or leave the pose
If it is painful, it is not yoga.
You should practice according to your abilities and experience. Progress will happen naturally through your daily practice and you’ll see visible results. Just trust your practice and make it a habit.
SIMPLE TWIST
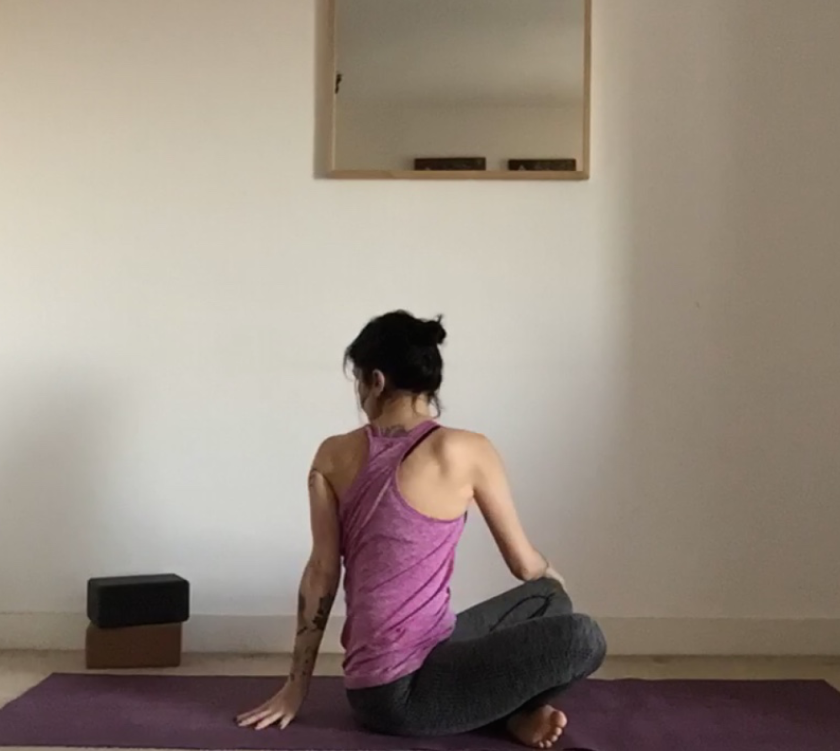
So, let’s start with the right side.
Start in an easy pose – simple crossed legs seating position. If your hips are tight, you can add an extra blanket or a meditation cushion between your back and the yoga mat. This will help to release the tension.
Lengthen your spine and keep a natural but straight position, keep your arms parallels to your body, look in front of your toward the horizon, relax your face, keep the chin in a natural position.
Close your eyes, stay here for 5 breaths. Listen to your breath, heartbeat and body.
Feel the position, relax.
Rotate your head, chest and abdomen to the right, place your left hand on your right knee and use the left arm as a leverage to help you twist on the right side.
Advanced variation – twist your head, shoulders and ribs further back while keeping the chin and face relaxed. Look past your right shoulder and feel the stretch through the entire spine. Keep on breathing naturally.
Beginner’s variation – help yourself balance with the right arm. Keep it engaged and steady. While turning on the right side, keep it nice and slow. No rush.
Stay here for 5 breaths. Repeat on the left side.
You can repeat this exercise more than once, especially if you are using as a stretching and warming up aid before your yoga class or your home-based practice.
Check my IG for more tips on how to do this day 1 of #THFChallenge16!
Digestion tips
I’m a vegetarian by choice and although I am not forcing you to do the same, there are many personal and social benefits in being a vegetarian.
It is good for the planet, our animal friends and in general, our health.
But it is also through that if eating is a very intimate and personal activity, I carefully consider what I eat/drink and like to eat properly to feel strong, have the right amount of energy and practice daily.
So if you like vegetable and fruit and want to help your digestion, boost your energy but still don’t know how to mix ingredients and create yummy recipes, check Simple Green Smoothies.
This website is absolutely amazing and inspiring. From fruit to vegetables, mixed smoothies and green challenges, you’ll find everything you need.
Smoothies & salads are my faves. They are easy, quick and always fresh.
I prepare my smoothies mixing vegetables and fruit, follow their recipes and in some cases create my own variations.
I particularly like the Post Workout Green Smoothie as I have always struggled with post workout snacks (what shall I eat? Shall I have carbs? No? But I deserve it!).
The only big downside of fresh smoothies is that they have to be prepared on daily basis, so yes, it can be a bit challenging.
But it’s really a 5 minutes habit that can be easily included in your workout schedule.
Alternatively, you can set yourself a weekly time, like 2 smoothies a week, while the other 2 workout days you’ll go for a gluten free ready made snack, or a fruit.
I bet you will quickly choose the smoothie over the snack once you have tasted one. Addictive.
Alright friends, that’s all for now!
Remember to share you #THFChallenge16 Day 1 pic with me on IG today!
I’ll be back tomorrow with a the #upwardfacingdog pose and more healthy tips!
How are you? Hope you are having a great weekend and your 2016 started the right way! 🙂
And if you’re still feeling the goodness and vibes of the holidays, don’t worry. I’m here to rock your month, with a healthy challenge!
They say January is the Monday of the year, isn’t it? And, indeed, after 2 weeks of fun, family and friends, I am finding getting back on track quite hard. Lazy mornings, yummy treats and hot coffee are still my faves, these days.☕️☕️☕️ But I am also starting teaching in a few days and I’ll have to attend my practices regularly, too. So, what about energising our routines with a sweet, easy, healthy challenge? 🙂
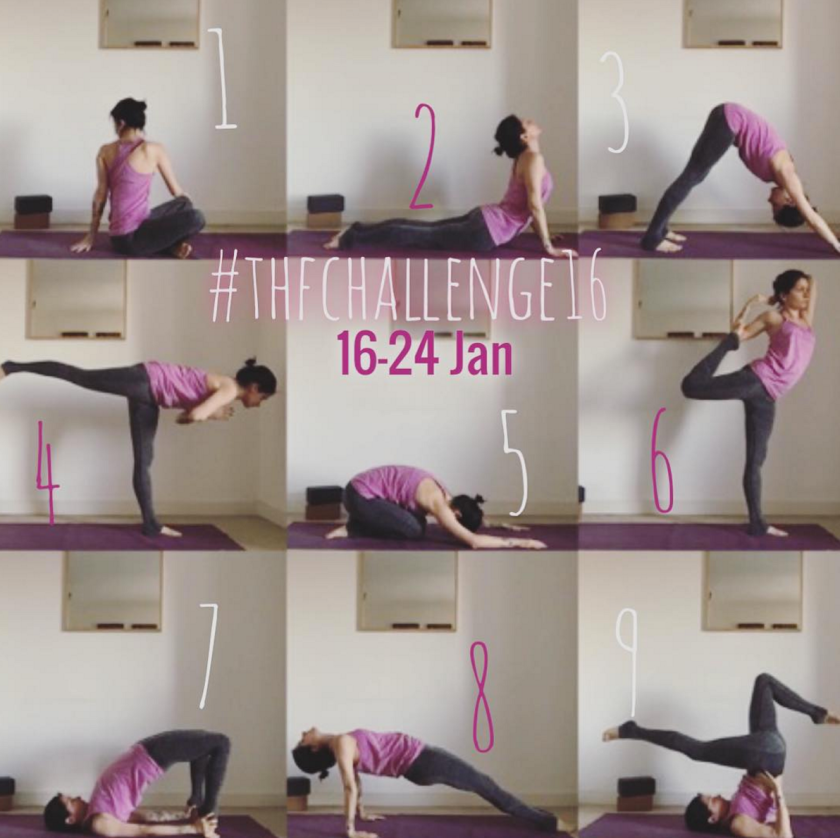
#THFChallenge16 is here with 9 yoga for beginners poses, daily fitness tips and recipes you can use and share with your friends to get back on track and feel the vibes of this incredible new year.
🌟 2016 🌟 is going to be amazing. Because you will make it an amazing year. No excuses. Love, love, love.
Start from you mat, 10 minutes a day. Relax, enjoy the present and love the new year.
You can do great, incredible things.
And if you are reading this…thank YOU🙏 for believing in the healthy way and for being a HEALTHY human!
Yes, YES. You are already fully surrounded by the #THFChallenge16, just because you are reading this and making your day a bit more healthy and loving. Shine on! 🌞
Love yourself, take a look at the pic here, follow the instructions and have FUN!
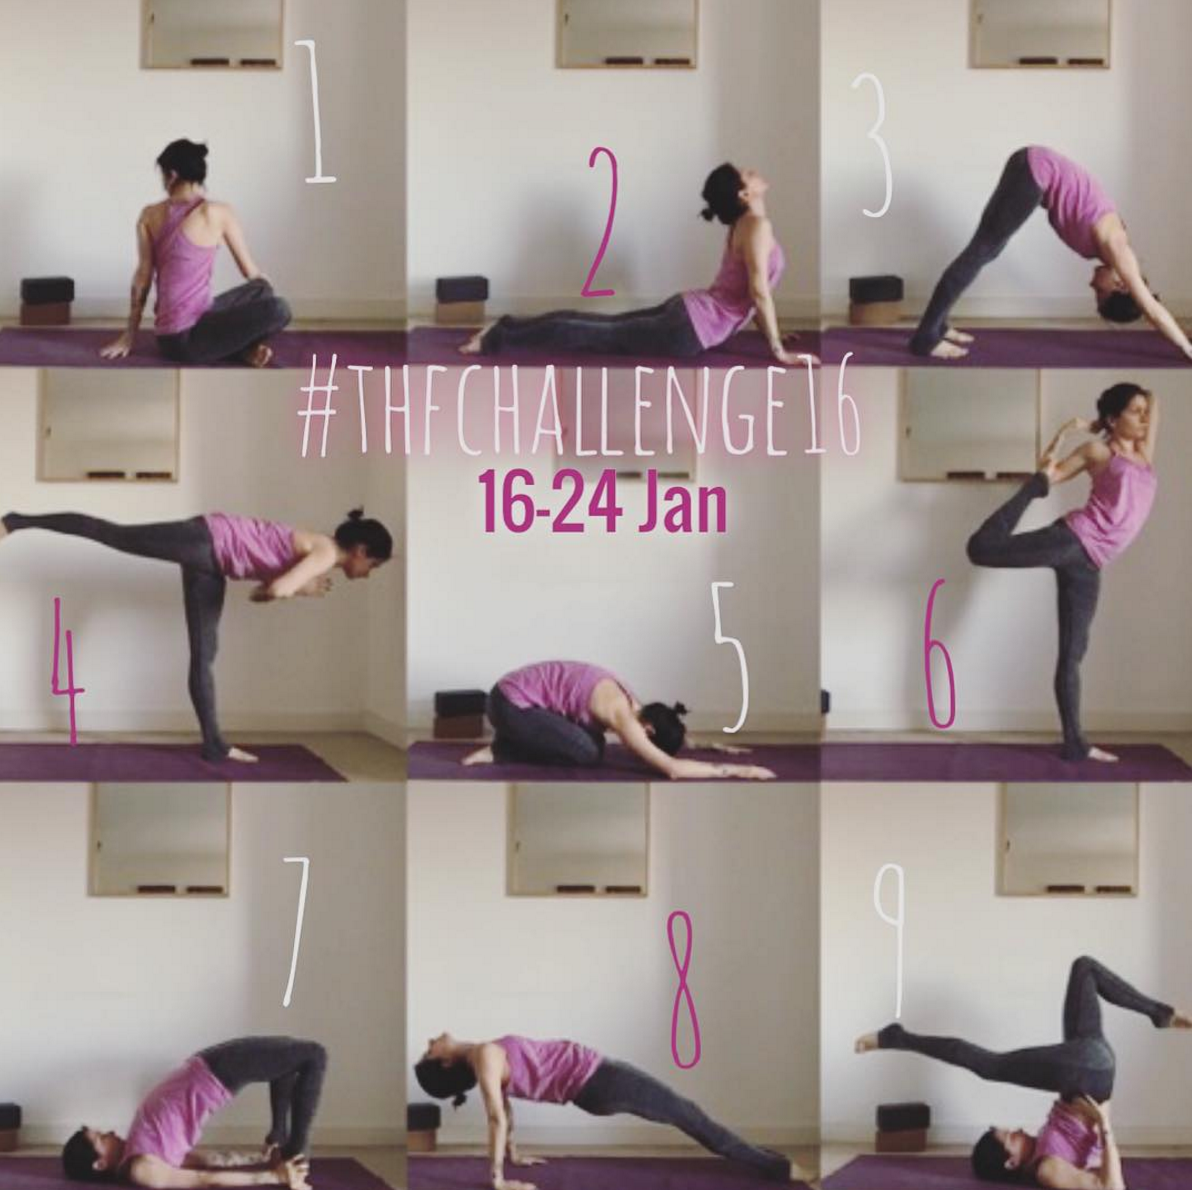
#THFCHALLENGE16
• 16 – 24 Jan
• 9 yoga poses:
1- simple sitting twist
2-upward facing dog
3-downward facing dog
4-warrior III
5-child’s pose
6-lord of the dance
7-bridge pose
8-upward plank pose
9-modified shoulder stand
👉 I’ll share daily descriptions of each pose with the details you need to modify it, so it’s really easy: you can join, too!
👉 Moreover, each post will contain fitness & healthy tips for you to improve your daily habits and feel great in 2016.
•Winners:
I’ll choose a daily winner who’ll get a social media shoutout!
At the end of the challenge, I’ll also choose a 1 final WINNER who’ll get a chance to be featured on my blog (yes, yes!), as well! 👑👑👑
🔥 TAG me in your pictures and use the #THFChallenge16
🔥 Share the pic with your friends and have fun!
F-U-Nis the key, people.
Relax and just try your best, there is no right or wrong in finding your healthy way, just enjoy the challenge.
Healthy takes strength and commitment, but you have to really LOVE what you do to make it a habit. So don’t worry about your yoga experience, this challenge is for you, too!
You have 9 different poses, grab your mat and let the #THFChallenge16begin!